I love when clients come back! I was lucky enough to make Charlie's first birthday cake, an Iowa Hawkeye theme found here. This year he had a sports ball theme, including basketball, soccer, football, and baseballs. I included all four into one cake!
Wednesday, November 7, 2012
Monday, October 29, 2012
Caramel Apple Cupcakes
These have been on my Baking Bucket list and on my mind for a long time. Apparently I'm not the only one! My friend Tera had Caramel Apple cupcakes as one of her flavors at her wedding a year and a half ago, ever since her mother has been thinking about them and wanting them again. So I got a special request for them, along with 3 other flavors for Tera's sister's graduation celebration.
Caramel Apple and Strawberry Lemonade Cupcakes
I, of course made extra to test out for my husband and I. Dave gets to be my guinea pig a lot, lucky him! He got to be the first to try the Caramel Apple Cupcakes out. He was such a fan that after his first bite he actually cussed! I won't repeat what he said but it was his way of saying "These are awesome!" ;)
They are made with a fresh apple cake that is so moist and flavorful then topped with a caramel buttercream (made with homemade caramel sauce) and garnished with an apple slice dipped in caramel sauce.
I think these are one of my new favorites!!
Monday, October 1, 2012
Baked Cauliflower Poppers
I recently found this recipe at delightedmomma.com for a great snack or appetizer substitute for chips or french fries. I'm not a huge fan of cauliflower but eat it because it's a vegetable, usually covered in ranch dressing so it might defeat the purpose of it being a healthy snack. However, I never knew cauliflower could be so good with just olive oil and roasted golden brown. The browner the better! I thought it was a great alternative to french fries and delicious dipped in a bit of ketchup.
Ingredients
Preheat oven to 400 degrees. Wash and clean the cauliflower, cut off and discard the stem, then cut the cauliflower up into small pieces. In a large bowl, combine the olive oil, salt and pepper. Add the cauliflower pieces and thoroughly coat each piece. Place cauliflower pieces onto a baking sheet lined with parchment paper. Bake for one hour and turn 3 times during cooking until each piece has a nice brown coloring. The browner they are the better.
Baked Cauliflower Poppers
Source: delightedmomma.com
Ingredients
- 2 heads of cauliflower
- 1/4 cup of olive oil
- 1 1/2 teaspoon of salt
- 1 teaspoon of pepper
Preheat oven to 400 degrees. Wash and clean the cauliflower, cut off and discard the stem, then cut the cauliflower up into small pieces. In a large bowl, combine the olive oil, salt and pepper. Add the cauliflower pieces and thoroughly coat each piece. Place cauliflower pieces onto a baking sheet lined with parchment paper. Bake for one hour and turn 3 times during cooking until each piece has a nice brown coloring. The browner they are the better.
Saturday, September 29, 2012
I'm Coming Back!
So life happened and little man came 3 weeks earlier than expected so I never got a chance to publish all my pending posts. Now that I'm we're adjusting to life with a newborn and I'm finally figuring out this motherhood thing, its time to get back in the kitchen! I will be backdating all my pending posts to get all could up so I can start publishing some new work and taking on new orders!
Monday, August 6, 2012
Ladybug Birthday
Ladybug birthday themes seem to be popular this year. It's a perfect party theme for a little girl, especially a 1st birthday!
Tuesday, July 31, 2012
Thursday, July 26, 2012
Thursday, July 19, 2012
Freezer Meals Part 3
Easy Beef Enchiladas
Makes 8 servings
Ingredients:Makes 8 servings
1 pkg 6 inch flour tortillas (8)
1 lb ground beef
1 medium onion
1-2 cloves of garlic, minced
1 can diced green chilies
2 cans enchilada sauce (heat level to your preference, I use 1 medium, 1 hot)
2 cups cheddar cheese, divided
1/2 Tbsp cumin
1/4 tsp chili powder
cayenne pepper to taste
salt and pepper to taste
cilantro, chopped
Directions:
Preheat oven to 375°. Cook onions and ground beef until hamburger is brown and onions are soft. Add garlic and cook for a few more minutes. Turn off the heat and drain off the fat (I usually save a little for flavor). Add in 1/2-3/4 of one can of enchilada sauce, green chilies, cumin, chili powder, salt, and pepper. Stir in the cheese and cilantro to taste. Your filling should have a thick but smooth consistency. If necessary, add more sauce. Draw a line through your filling to cut it in half. This will make it easier to judge how much to put in each tortilla. Spoon filling into a tortilla. Roll up and place seam side down in a greased 9x13 pan. Pour the rest of the sauce over the enchiladas and top with remaining cheese. Bake for 30-45 minutes or until bubbly and the sauce has a chance to thicken. Garnish with cilantro before serving.
Classic-Meatloaf
Yields: 6-8 servings
Yields: 6-8 servings
Ingredients:
Meatloaf:
1-1/2 pounds lean ground beef or turkey
3/4 cup oatmeal
3/4 cup oatmeal
1 cup finely chopped onion
1/2 cup tomato sauce or ketchup (Hunts makes a really great meatloaf "ready" tomato sauce)
1 egg, lightly beaten
1 tablespoon Worcestershire sauce
2 cloves garlic, minced
1/2 cup tomato sauce or ketchup (Hunts makes a really great meatloaf "ready" tomato sauce)
1 egg, lightly beaten
1 tablespoon Worcestershire sauce
2 cloves garlic, minced
1/2 teaspoon salt
1/4 teaspoon black pepper
1/4 teaspoon black pepper
"Glaze"
1 cup ketchup
4 T brown sugar
4 T vinegar
2 T Worcestershire sauce
Directions:
1. Heat oven to 350°F. Combine all ingredients in large bowl; mix lightly but thoroughly.
2. Bake 40 minutes, remove meatloaf from oven and spread glaze over the top. Return to oven and cook 10-15 more minutes or until meatloaf is cooked to medium (160°F for beef, 170°F for turkey), or until not pink in center and juices show no pink color. Let stand 5 minutes before slicing.
2. Bake 40 minutes, remove meatloaf from oven and spread glaze over the top. Return to oven and cook 10-15 more minutes or until meatloaf is cooked to medium (160°F for beef, 170°F for turkey), or until not pink in center and juices show no pink color. Let stand 5 minutes before slicing.
Freezing Instructions:
There are a few options for freezing:
1. Freeze raw. Wrap air tight then freeze in reusable or disposable loaf pans. Thaw and bake as directed or put meatloaf in oven before preheating and cook 10-15 minutes longer than directed.
2. Bake then freeze whole. Allow to thaw and reheat in the oven or microwave.
3. Bake, slice, then freeze individual servings.
Monday, July 16, 2012
Freezer Meals Part 2
I eat a lot of chicken so I knew I needed to have a few meals in the freezer for dinner while on maternity leave. I bought 2 small whole chickens in which I boiled and cooked myself to make my own chicken both. I froze any the left over chicken broth I did use for my freezer meals to later use. I then made all my chicken meals in one evening, one at a time as a little assembly line to make things easier on me.
White Chicken Enchiladas
Chicken enchiladas with green chili sour cream sauce
- 10 soft taco shell
- 2 cups cooked, shredded chicken
- 2 cups shredded Monterey Jack cheese
- 3 Tbsp. butter
- 3 Tbsp. flour
- 2 cups chicken broth
- 1 cup sour cream
- 1 (4 oz) can diced green chillies
1. Preheat oven to 350 degrees. Grease a 9x13 pan
2. Mix chicken and 1 cup cheese. Roll up in tortillas and place in pan.
3. In a sauce pan, melt butter, stir in flour and cook 1 minute. Add broth and whisk until smooth. Heat over medium heat until thick and bubbly.
4. Stir in sour cream and chilies. Do not bring to boil, you don't want curdled sour cream.
5. Pour over enchiladas and top with remaining cheese.6. Bake 22 min and then under high broil for 3 min to brown the cheese.
Chicken Pot Pie
makes 6-8 servings
makes 6-8 servings
Ingredients:
1 pound skinless, boneless chicken breast halves - cooked and cubed (or 1 lb cut up chicken pieces)
2 cups mixed frozen vegetables
1/3 cup butter
1/2 cup chopped onion
1/3 cup all-purpose flour
1/2 teaspoon salt
1/4 teaspoon black pepper
1/2 tsp rosemary, oregano, or thyme (I like to mix up which spice I use each time)
1 3/4 cups chicken broth
2/3 cup milk
2 (9 inch) unbaked pie crusts
1 egg
1 Tbsp water
Directions:
1. Preheat oven to 425 degrees F (220 degrees C.) Unroll and place one pie crust in a pie pan, leaving the edges to crimp later.2. In a separate bowl, mix chicken and frozen vegetables, set aside.
2. In a separate bowl, mix chicken and frozen vegetables, set aside.
3. In a saucepan over medium heat, cook onions in butter until soft and translucent, . Stir in flour, salt, pepper, and herb of choice. Slowly stir in chicken broth and milk. Simmer over medium-low heat until thick. Remove from heat and set aside.
4. Place the chicken mixture in bottom pie crust. Pour hot liquid mixture over. Cover with top crust, and seal edges. Make several small slits in the top to allow steam to escape. Mix egg and water and brush over the top of the pie crust. Sprinkle with extra herb you used in the filling.
5. Bake in the preheated oven for 30 to 35 minutes, or until pastry is golden brown and filling is bubbly. Cover edges of pie if start to get too brown. Cool for 10 minutes before serving. Freezer Directions: Brush on egg wash and cover first with plastic wrap very tight, making sure to press down in all the creases, almost making a second skin. Pop in the freezer until completely frozen, then cover very tightly with aluminum foil. Write baking directions on top of foil. If baked frozen add at least 15-20 minutes on cooking time. If defrosted about 10 more minutes. Watch for burning crusts!
Chicken Spaghetti
Yield: 10-12 servings
Yield: 10-12 servings
Ingredients:
3 cups cooked chicken
3 cups broken spaghetti
1 can cream of chicken soup
1 can cream of mushroom soup
3 cups shredded cheddar cheese
1/4 cup finely diced green pepper
1/2 cup diced onion
1 jar (4 oz) pimentos, drained
2 cups chicken broth (I use the broth from my chicken)
1 tsp seasoned salt
1/4 tsp cayenne pepper
salt and pepper to taste
Directions:
Preheat oven to 350 degrees F (175 degrees C). Cook 1 cut up fryer and pick out the meat to make three cups. If you don't have a cut up fryer chicken, you can substitute any chicken pieces (sometimes I just use breast meat). Cook spaghetti in same chicken broth (or in boiling water) until al dente. Do not overcook. When spaghetti is cooked, combine with remaining ingredients except 1 cup sharp cheddar. Spread mixture into a 9x13 inch baking dish and bake in the preheated oven for 30 minutes. Sprinkle remaining cup of cheese on top and bake for another 15 minutes. Another option is to go ahead and sprinkle with cheese just be careful the cheese doesn't burn, if it starts to turn, just cover with foil.
Freezing Instructions:
Prepare casserole, add cheese to top of casserole but do not bake. Cover tightly with aluminum foil and freeze up to three months. Allow casserole to defrost and bake as directed.
Friday, July 13, 2012
Freeze Ahead Breakfast
With the impending arrival of our little man fast approaching, I have been wanting to make a few different Make Ahead Meals to put in the freezer for after his arrival.
I must admit these last 8+ months I have gotten pretty lazy with cooking AND blogging about all my baking adventures...as my blog has reflected. I still have several baking posts to finish....eventually, maybe while I'm on maternity leave?! I'm assuming I will be even more lazy, or at least just won't have the time nor energy to make dinner once Baby Dexter is here, especially since I (fingers crossed) hope to exclusively breastfeed his first few months at least.
Last weekend was a HUGE cooking weekend for me!! Aside from baking my last cake until the Fall, I did all my grocery shopping to prepare for my cooking event one day, poached my chickens and made homemade chicken broth another day, and prepared about 7 different meals on two other days.
Over the next week I will post several posts about the meals I made along with a few tips.
Let's start with the most important meal of the day, breakfast!
I'm usually pretty boring when it comes to making myself breakfast, I usually stick to boring cereal, toast, or a bagel with cream cheese. Breakfast for dinner is a totally different story though and for an entirely different post, it's our favorite! When thinking about having a newborn around soon and not having a lot of time for breakfast in the mornings, I wanted to make sure I have the option of having something I can grab pretty quickly and make with little effort. I love me a McDonald's Egg McMuffin but am pretty sure I want to be leaving the house every morning with a little in tow to get one, plus all that added sodium and fat...we don't need. I decided to make my own breakfast burritos and sandwiches! These are quick, easy, filling, fairly inexpensive (compared to going to McD's every day), and I can control how much sodium is added to them.
Ingredients:
· 1 lb. Pork Sausage
· 1 Pkg. Hash browns
· 8 to 12 Large eggs
· 1/4 cup milk
· 1 pkg. shredded cheese
· salt and pepper to taste
· 1 to 2 pkg. flour tortillas
1. Brown sausage - drain on a paper towel.
2. Cook hash browns in the same pan.
3. While the hash browns are cooking - In a large mixing bowl, whisk eggs, milk, salt and pepper.
4. Add browned sausage back to the pan with the cooked hash browns.
5. Add the eggs to the sausage mixture and cook until the eggs are done, stirring gently.
6. After eggs are done - lay a tortilla on counter. Place egg mixture on tortilla. Top with cheese. Roll into a burrito.
7. Depending on how many eggs you use and how large you make each burrito, will determine how many burritos you will end up with. I used ten eggs which made me twenty-five burritos.
8. Wrap each burritos in Saran wrap. Then place the wrapped burritos in freezer zip-lock bags.
From Freezer: Take the number of burritos you want out of the freezer, unwrap Saran wrap and place burritos in a paper towel. Warm for 45 seconds, rotate, warm for an additional 30 seconds. Serve with salsa, sour cream, or plain.
Breakfast Sandwiches
Ingredients
- 12 English muffins
- 12 eggs
- 1/4 cup milk
- salt and pepper to taste
- 12 slices of cheese
- 1/2 pound of bacon
1. Start by cooking the bacon. I used turkey bacon because I love it more than regular bacon but either will work. I cooked my bacon in the oven on 350 degrees for 15 minutes until lightly browned, this is the best way to cook regular bacon so it won't curl up like it will in the microwave or in a skillet.
2. While the bacon cook, whisk together eggs, milk, salt and pepper in a bowl until combined. Cook in large skillet over medium heat until scrabled.
3. Once everything had finished cooking and slightly cooled, assemble the sandwiches. Break English muffins apart and put a spoonful of eggs, one slice of bacon (I split mine in halves to fit), and one slice of cheese on each muffin.
4. Wrap each sandwich in Saran wrap and place them in a gallon Ziploc bag. Then they are ready for the freezer.
From Freezer: Unwrap sandwich from saran wrap, place in paper towel and heat in microwave on HIGH for 2 minutes.
Sausage Breakfast Burritos
Friday, June 8, 2012
Tinkerbell Cake
Tinkerbell Birthday Cake
Dave was a HUGE fan of this cake! I think he was the most excited about it once he saw how it turned out, which really shouldn't surprise me with his love for all things Disney! :)
I used the Barbie cake pan from Wilton and used an actual Tinkerbell Barbie doll (found at Target) instread of the half dolls included with the pan or that you can buy at the craft store for these kinds of cakes. That way the birthday girl was able to keep her full length Tink as a birthday gift from the cake lady!
Butterfly Cake
Butterfly Birthday Cake
My first butterfly cake and I think only my second time trying my hands at carving!
For this cake I printed off a coloring page from on-line and re-traced it on wax paper to fit the size of the cake I had. I cute out the butterfly and laid it on top of the cake so I would carve around the outside for the shape. After I peeled off the wax paper, I just used a knife to outline the design of the butterflies wings on the cakes and used different colored buttercream frosting to fill in.
I wish I would have outlines the entire butterfly's wings in the black to define them better in the picture.
The birthday girl requested pastel pink, purple and yellow for her butterfly.
Saturday, June 2, 2012
Buzz Lightyear
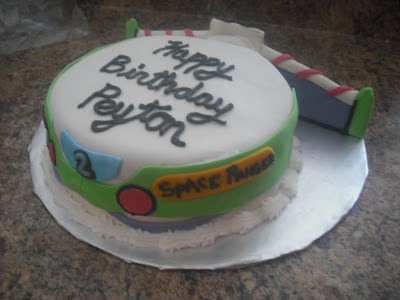
Buzz Lightyear Cake for a 2nd birthday.
I got to make Peyton's first birthday cake last year, seen here, so I feel privilaged to get to make his second cake this year!
This is a 2-layer vanilla cake with a chocolate mousse filling and a chocolate buttercream frosting, covered in marshmallow fondant.
I made the wings out of cardboard then covered then in fondant, so they aren't fully eidable!
Labels:
birthday,
boy cake,
cake,
Disney theme,
fondant,
Kids,
Themed Cakes
Tuesday, May 29, 2012
Princess Aurora
I love trying new things and being tested with my baking skills, especially since I'm still very new at this and have so much to still learn when it comes to cake decorating.
Last week I got a call for a Princess birthday cake in which my customer wanted to order as a sheet cake. The birthday girl really wanted Princess Aurora from Sleeping Beauty but they were having trouble finding anyone who could do a Disney princess so they would settle for any princess. I of course did not want to disappoint a little birthday girl so I looked for ideas on-line and found a new technique to try out called Frozen Buttercream Transfer.
I found this great YouTube video found here that gave a really good tutorial. Basically all you need is a printed out image such as a coloring page at the size you need, wax paper, a cookie sheet, tape, and prepared buttercream in all the colors you need. First outline the image then start filling in practically like a paint by number. I froze mine for 24 hours before transferring onto my prepared sheet cake, peel off the wax paper and the pipe a boarder about the image since it's a bit thick.
And this is what I got!
Birthday girl Brynn was so surprised she actually got Princess Aurora on her cake!!
Saturday, May 12, 2012
Hawkeye Graduates
Another school year has come to an end....congrats to all the new graduates of 2012!!
This weekend the University of Iowa is holding their commencements and we know two wonderful students who will be receiving their diplomas.
These two special students requested chocolate cupcakes with peanut butter frosting and red velvet cupcakes with cream cheese frosting.
I adorned these yummy graduations cupcakes with tiny little graduation caps, cute little diplomas, the U of I Tigerhawk, and a “2012” pennant. I think they turned out adorable!!
Congrats Matt and Casey on your huge accomplishment!
Friday, May 11, 2012
DIY Cupcake Stand
Cupcake Stand Instructions (holds 48-120 cupcakes)
Supplies:
3 foam core boards, ¼” thick Dimensions: 20” x 30” (available at Staples or Michael's)
Exacto knife
Ruler
Hot glue gun
Modge Podge adhesive
Paper (wrapping paper or ten pieces of 12 x 12 scrapbook paper)
Ribbon (5 yards)
Directions:
1. Make your cuts…
a.) Foam board piece 1cut a square 20” x 20” = Tier 1
cut a square 8” x 8” = Tier 4
b.) Foam board piece 2
cut a square 16” x 16” = Tier 2
cut a square 12” x 12” = Tier 3
2. Cut your tier supports…using Foam board piece 3
a.) for tier 1…cut 4 strips 2” high x 10” long
b.) for tier 2…cut 4 strips 4” high x 8” long
c.) for tier 3…cut 4 strips 4” high x 6” long
d.) for tier 4…cut 4 strips 4” high x 4” long
3. If you plan on covering your stand with scrapbook paper now is the time. Cover all of your Tiers with paper using Modge Podge adhesive. If you are using 12 x 12 scrapbook paper, tiers 1 & 2 can be tricky. Cut 2 pieces of 12” x 12” scrapbook paper in half diagonal (see source link). Then use the 4 pieces and glue it on the board. Trim edges with an exacto knife.
4. While your tiers dry make your tier supports. Starting with the “foot” of the stand, glue the corners of the
2” x 10” together. Continue by gluing the rest of the tier supports together so they are all square.
5. Cover the tier supports with paper.6. If you want you can hot glue ribbon to the edges of each tier. It’s easier to do this prior to gluing the tiers to the tier supports.
Hot glue the 2” x 10” tier support to the bottom side of the 20” x 20” tier.
Hot glue the 4” x 8” tier support to the bottom side of the 16” x 16” tier.
Hot glue the 4” x 6” tier support to the bottom side of the 12” x 12” tier.
Hot glue the 4” x 4” tier support to the bottom side of the 8” x 8” tier.
8. Glue the 8” x 8” to the top of the 12” x 12”. Glue the the 16” x 16” to the top of the 20” x 20”.
Glue the two pieces together & you have your cupcake stand.
I wanted to keep my cupcake stand white so I would be able to easily reuse my stand for any occasion. In order for me to be able to change the ribbon colors out for each use I did not hot glue my ribbon, instead I used corsage pins round each layer to hold the ribbon in place. It also added a nice detail with the pearl pin top. Since I didn’t use scrapbook paper to cover any of the tiers, I wrapped additional ribbon on coordinating colors around each tier support to add a pop a color behind the cupcakes.
This cupcake/cake stand was made for my first wedding! It is definitely light weight and easy to move/transport yet still sturdy enough to hold 100 cupcakes or a small cake topper.
Subscribe to:
Posts (Atom)


