Saturday, December 24, 2011

Cookie Dough Truffles

Anytime I make chocolate chip cookies I can't help but eating some of the raw cookie dough. However, I know you're not suppose to since it has raw eggs in it. This is a great way to still get that cookie dough taste without worrying about any raw and uncooked products. No eggs even included. And no cooking! They have mini chocolate chips inside and are covered in semi-sweet chocolate and drizzled with milk chocolate. It's a triple chocolate trifecta. Yum! 

Cookie Dough Truffles
www.jamiecooksitup.blogspot.com
Yield: 48 truffles

Time: about 40 min hands on time + 2 hours to freeze before dipping

1/2 C butter, softened
3/4 C brown sugar, packed
2 1/4 C flour
1 -14 oz. can sweetened condensed milk
1 t vanilla
1/2 C mini chocolate chips
2 -12 oz bags semi sweet chocolate chips
1/4 C milk chocolate chips
1 T shortening, divided

1. Cream your butter and brown sugar together until light and fluffy.

2. Add the flour, sweetened condensed milk and vanilla and mix well.
3. Stir in the mini chocolate chips.
4. Shape into 1 inch balls and place on a sprayed cookie sheet. Cover with saran wrap and freeze for 1-2 hours. You want them to be firm here folks. It makes the dipping a lot easier.
5. In a liquid measuring cup (I used the cup that will hold 16 oz, or 2 cups) melt your semi sweet chocolate in the microwave. Only heat it for 30 seconds at a time, stirring after each heating interval.
Add about 2 t of shortening to the chocolate and stir to incorporate.
6. Dip each frozen cookie dough ball into the chocolate and then place on wax paper.
7. Melt the milk chocolate in the microwave and add 1 t shortening. Stir it well and then drizzle it over the tops of the truffles.
7. Put the truffles back in the fridge to set for about 15 minutes.
Enjoy!

X-mas Sweaters Take 2

Another order of Ugly Christmas Sweater Cupcakes.

Thursday, December 22, 2011

Candy Bar Caramel Corn

I know I've said before how I love homemade caramel corn. This time around it's been taken to a whole new level! Caramel corn with candy bar chunks then drizzled with white and semi sweet chocolate...addicting! My dad can atest to that, he LOVED it!
Crunchy Candy Bar Caramel Corn
www.jamiecooksitup.blogspot.com
Time: 30 minutes + 15 minutes to set up

Yield: One large jelly roll pan full
Recipe adapted from Your Homebased Mom

16 C popped popcorn (1/2 C unpopped)
1 C brown sugar
1/4 C corn syrup
1/2 C butter
1/2 t baking soda
1 t vanilla
15 fun sized candy bars (I used twix, milky way and 1000 Grands)
1 C white chocolate chips
1/2 C semi sweet chocolate chips
1 t shortening

1. Pop 6 cups of popcorn.
2. In a medium sized glass bowl, or large glass measuring cup, place the butter, brown sugar and corn syrup. Heat it in the microwave for 1 minute. Stir the ingredients together with a wooden spoon. Repeat this step four more times.
Heat and stir...
Heat and stir...
Heat and stir...
and a final "heat and stir". It should be very bubbly and hot at this point.
3. Add the baking soda, vanilla and a dash of salt.
4. Pour the popcorn into a large brown paper grocery sack.
5. Pour the caramel right into the bag on top of the popcorn. Stir it around with a wooden spoon.
6. Fold the bag over and place it in the microwave, heat for 1 minute. Take the bag out of the microwave and shake it....shake it.....shake it.
7. Return the bag to the microwave and heat it for an additional 30 second, then shake it again.
8. Pour the caramel corn out onto a large jelly roll pan, lined with parchment paper.
9. Chop up the candy bars and lay them out over the caramel corn.
10. Heat the white chocolate chips in the microwave, for 30 seconds at a time, stirring after each heating interval. Don't let the chocolate get too hot. Add 1/2 t shortening to the melted chocolate and stir to combine.
11. Drizzle the white chocolate over the top of the caramel corn and candy bars.
12. Melt the semi sweet chocolate just like you melted the white chocolate. Drizzle it over the caramel corn.
13. Let the chocolate set up (you can pop it into the fridge for 10 minutes to hurry along the process). Break it up into chunks and serve. Store any leftovers in an air tight container.


Enjoy!

Monday, December 12, 2011

Sweaters & Hot Cocoa Cupcakes


Ugly Christmas Sweater Party's have become all the rage the last few years. I think the last three or so years we've been invited to one. This past Saturday our friends Sean and Annette had their first Ugly Sweater party, so in keeping with the theme I decided to make cupcakes that fit the occasion. I tried Googling them for other people's ideas but only came up with one!!  So I can actually say these are a "My Buns Are Done Original"!!

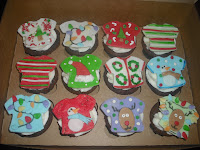
I was told that some of them aren't even ugly, they're cute and they would actually wear them. So let's just call them Christmas Sweater Cupcakes :)  I do love how they turned out thouugh!!


I wanted to made these Ugly Christmas Sweater Cupcakes with a festive cupcake, I choose a hot chocolate cupcake with mint buttercream frosting. I found this recipe, although it calls for peppermint bark to add as the garnish so I included it for you in case you don't want to make your own marshmallow fondant Christmas Sweaters.


Hot Chocolate Cupcakes with Peppermint Buttercream
(makes 24 cupcakes)

For the cake:
2 1/2 cups all-purpose flour
2 cups granulated sugar
1 cup cocoa powder
2 tsp baking powder
1 tsp baking soda
1 tsp salt
3 eggs
1 packet Hot Chocolate mixed with 1 cup warm milk
1 cup vegetable oil
1 tsp vanilla extract
  1. Preheat oven to 350 degrees and line muffin pans with cupcake liners.
  2. In bowl of stand mixer combine dry ingredients: flour, sugar, cocoa powder, baking powder, baking soda and salt.
  3. Add wet ingredients to dry ingredients: eggs, hot chocolate/milk mixture, vegetable oil and vanilla.
  4. Beat on medium speed until well combined, scraping down sides of bowl as needed.
  5. Fill cupcake liners 2/3 full with batter.
  6. Bake for 16 minutes or until toothpick inserted in center comes out clean.
  7. Let cupcakes cool in pans for 5 minutes, then remove to wire racks to finish cooling.
  8. Once cupcakes are completely cool frost with Peppermint Buttercream and garnish with Peppermint Bark.
For the icing:
3 sticks unsalted butter, softened
6 cups confectioner’s sugar
1/4 – 1/2 cup milk
1 1/2 tsp peppermint extract
  1. In bowl of stand mixer beat butter until creamy.
  2. Gradually add in confectioner’s sugar one cup at a time, scraping down sides of bowl as necessary.
  3. Add milk until you reach desired consistency.
  4. Add peppermint extract and mix well.
  5. Place icing in piping bag fitted with a large round tip and frost cupcakes.
  6. Garnish cupcakes with Peppermint Bark and white nonpareils (optional).
Peppermint Bark:
12 oz Chocolate Bark
12 oz Vanilla Bark
20 mini candy canes, crushed
1/2 tsp peppermint extract
  1. Line a baking sheet with wax paper.
  2. Melt chocolate bark in microwave safe bowl for 1 minute. Continue to microwave at 15 second intervals until melted. Pour melted chocolate onto prepared baking sheet and spread evenly with a spatula. Let chocolate harden for about 30 minutes.
  3. Melt vanilla bark in microwave safe bowl for 1 minute. Continue to microwave at 15 second intervals until melted.
  4. Add peppermint extract to melted vanilla and stir. Pour melted vanilla overtop of hardened chocolate and spread evenly with a spatula.
  5. Sprinkle crushed candy canes ontop of candy bark.
  6. Allow bark to harden for about 30 minutes before breaking into pieces. Garnish cupcakes.
Wishing you all a very Merry Christmas!

Wednesday, December 7, 2011

Mini Cheesecakes

The perfect mini dessert! I served mine with a teaspoon of strawberry jam and fresh chopped strawberries.

Individual Cheesecake Cupcakes
  • 1 (12 ounce) package vanilla wafers
  • 2 (8 ounce) packages cream cheese
  • 3/4 cup white sugar
  • 2 eggs
  • 1 teaspoon vanilla extract
  • favorite toppings
Preheat oven to 350 degrees F.  Line muffin tins with miniature paper liners.           
Crush the vanilla wafers, and place 1/2 teaspoon of the crushed vanilla wafers into each paper cup. In a mixing bowl, beat cream cheese, sugar, eggs and vanilla until light and fluffy. Fill each miniature muffin liner with this mixture, almost to the top. Bake for 15 minutes. Cool. 

Saturday, December 3, 2011

I'm Back

I've been here for 7 days.

Punta Cana in the Dominican Republic. Husband and I needed a MUCH needed vacation and decided to take it for our Thanksgiving.

And lounging here, relaxing!

But I'm back and ready to reacquainted with my kitchen, which I have missed. I have lots of recipes I want to start cooking up this holiday season and cannot wait to get started.