Tuesday, February 28, 2012

Tutu Birthday Party

I got the pleasure of making a cake and cupcakes for the daughter of our friends fpr her 2nd birthday. They had a cute tutu themed birthday party for little Miss Gracyn, with hot pink and orange decor (seriously adorable!)

My first successful take at ribbon to top Gracyn's cake, I found a great tutorial on-line on how-to here.  I had a few ribbon casualities but luckily had made a few extra.


Chocolate Strawberry Covered Cupcakes (minus the chocolate covered strawberry on top) tinted extra pink and Chocolate Cupcakes with Peanut Butter Frosting tinted orange.

Vanilla Cake with Chocolate Chip Cupcakes with Chocolate Cream Cheese Frosting.

Happy Birthday Miss Gracyn!

Sunday, February 26, 2012

Gender Reveal Cupcakes


 Our friends Lincoln and Kylah are pregnant with their second child. They had their BIG ultrasound scheduled for Friday. Kylah asked if I could make some gender reveal cupcakes for them half of each color so they could take them to the grandparents to reveal which gender they were having right after their appointment. We decided on a chocolate cupcake with a creamy marshmallow filling topped with chocolate ganache and a white icing "?" (just like a homemade Hostess cupcake).

 I made half with blue tinted filling and half with pink. Making sure you were unable to see any color from the outside. In order to reveal what Kylah and Lincoln were having each grandparent was given the appropriate colored cupcake to break open and see....


They're having a BOY!
Congrats again Lincoln, Kylah and family! We are so happy and excited for you!

Sunday, February 19, 2012

Mint Chocolate Chip Cake

Another Love of mine: Mint Chocolate Chip Ice Cream

Although I don't eat ice cream very often, this is one my top flavors. So of course once I came across this cake, I knew it was a must have at some point. Luckily, I'm not the only one who loves this flavor ice cream. As soon as I told my friend Tera about this cake she immediately ordered it for her father's birthday since it's his favorite too!


Mint Chocolate Chip CakeSource: www.raspberricupcakes.com
  • 9 tbsp unsweetened cocoa powder
  • 1 1/2 cups cake flour (not self-raising, I just used plain flour and replaced 3 tbsp with cornflour/cornstarch)
  • 1 1/2 tsp salt
  • 1 tsp baking soda
  • 1/4 tsp baking powder
  • 1 stick unsalted butter, at room temperature
  • 1 1/2 cups sugar
  • 2 large eggs, at room temperature
  • 1/2 cup strong coffee (or water if you don't want to use coffee)
  • 1/2 cup whole or low-fat milk
For the icing:
  • 2.5 sticks unsalted butter, room temperature
  • 4 cups powdered sugar, sifted
  • 2-3 tsp peppermint extract, adjust to taste
  • 4-6 tsp water or milk
  • 3 Hershey's Special Dark Chocolate bars, very finely chopped or pulsed through a food processor
  • green food coloring
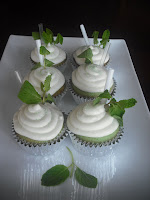
  • Optional: waffle ice cream cones to decorate
Preheat oven to 350°F. Prepare two 9-inch round cake pans. Sift together the cocoa powder, flour, salt, baking soda, and baking powder in a bowl. Using an electric mixer with a large mixing bowl, beat together the butter and sugar about 5 minutes until smooth and creamy. Add the eggs one at a time and beat until fully incorporated.
Mix together the coffee and milk. Stir half of the dry ingredients into the butter mixture, the add the coffee and milk. Finally stir in the other half of the dry ingredients until smooth. Split batter mixture between the two prepared pans. Bake for about 25 minutes, or until a toothpick inserted into the center of the cake comes out clean. Remove from the oven and cool in tin about 5 mins, then place on a wire rack and cool completely before icing.
 
For the icing: Place softened butter in a large mixing bowl and beat with an electric mixer on high until fluffy and smooth. Add sifted icing sugar one cup at a time, beating until combined. Add peppermint extract to taste and green food colouring. Add water or milk one teaspoon at a time to reach desired consistency for spreading on the cake. Gradually add chocolate chip pieces until you have a good distribution of chocolate bits.
Use about 1/4 of the icing on top of one of the cakes and smooth over with a spatula. Place second cake top side down on top of the iced cake. Cover entire cake with more icing, smoothing with a spatula. I used an offset spatula, running it under hot water every now and then to help keep the surface smoother. Use the leftover icing to form scoops of icing to place on top of the cake, arranged however you like. Use mini ice cream cones or chop the ends of normal-sized cones and place on top of icing scoops. Alternatively you could cover the top with extra dark chocolate chips. Can be served immediately or stored in an airtight container overnight. Serve at room temperature.

Saturday, February 18, 2012

Red Velvet Cheesecake Cupcakes

My Valentine's Day consisted of these beauties!


In honor of Valentine's Day I wanted to make something different but still screamed Valentine's! Plus, I really love cheesecake. These are a great combination of the traditional red velvet cupcake, chocolate, and cheesecake. They are rich, creamy and delicious!

Red Velvet Cheesecake Cupcakes
From: Betty Crocker
  • 24 thin chocolate wafer cookers, crushed (1 1/4 cups)
  • 3 Tbsp butter, melted
  • 2 pkgs (8oz each) plus 4 oz cream cheese, softened
  • 1 cup granulated sugar
  • 1/4 cup unsweetened baking cocoa
  • 2 tsp vanilla
  • 2 Tbsp red food coloring
  • 3 eggs
  • 1/2 cup whipping cream
  • 1 Tbsp powdered sugar
Heat oven to 350°F. Place foil baking cup in each of 16 regular-size muffin cups. In small bowl, mix cookie crumbs and melted butter. Divide crumb mixture among cups. With back of spoon, firmly press cookie crumbs in bottom of each foil cup.*

In large bowl, beat cream cheese with electric mixer on medium speed until smooth. Gradually beat in 1 cup granulated sugar and the cocoa until fluffy. Beat in vanilla and food color. Beat in eggs, one at a time, until well blended. Divide batter evenly among baking cups (cups will be almost full).

Bake 20 to 25 minutes or until centers are firm. Cool 15 minutes (cheesecake centers will sink while cooling). Refrigerate in baking cups at least 1 hour; cover and refrigerate at least 1 hour longer before serving.

In chilled small bowl, beat whipping cream and sugar with electric mixer on high speed until stiff. Spoon whipped cream on chilled cheesecakes. Just before serving, garnish with chocolate curls. Cover and refrigerate any remaining cheesecakes.

*An alternative crust I like to use for mini cheesecakes - Instead of making a crumb mixture, I just place a whole Oreo cookie into each cupcake tin. That's it! It's so easy, you don't have to make a mess crushing cookies or get any additional dished dirty!

Monday, February 13, 2012

Ladybug Birthday

One giant 3D ladybug for a 2nd birthday!


This is a chocolate cake with vanilla buttercream tinted red and black. This cake was easier than I thought it would be to construct. It is made out of 2 8-inch round cakes for the base. I put some of the cake batter into a glass bowl to bake to get the roundness  for the top and then a small portion of batter in a ramekin for the head.  

 The only thing not edible were the antenna's, made from black pipe cleaner from the craft store.


Happy 2nd Birthday Miss Lainey!!

Baby Ninja

I love getting requests that really make me think! My friend Hannah asked if I would make cupcakes for her sister's baby shower. The color scheme was hot pink and lime green. The cupcakes were chocolate with mint buttercream and strawberry cupcakes with strawberry frosting. The first request, vegetarian. Her sister is a vegetarian meaning no marshmallow fondant because marshmallow has gelatin in it. Second, the baby ninja. Her sister and her husband call the baby a ninja so she wanted that incorporated in her shower somehow.


I found a recipe for a Vegan fondant that I prepared. It was so easy and less messy to make then the marshmallow fondant. The only downfall was that it stayed really soft. It would be really hard to work with for a full cake but just small cutouts is no problem. As for the ninjas....

I wanted to make little baby ninjas on the cupcakes. I tried drawing them with edible marker but the fondant was too soft. So I ended up piping them on with frosting.

My first vegan recipe!
Vegan Fondant
  • 1 cup light corn syrup
  • 1 cup shortening
  • 1/2 teaspoon salt
  • 1 teaspoon clear vanilla extract
  • 2 pounds confectioners' sugar
DIRECTIONS

1. In a large bowl, stir together the shortening and corn syrup. Mix in the salt and vanilla flavoring, then gradually mix in the confectioners' sugar until it is a stiff dough. If you are using a stand mixer, use the dough hook attachment. Otherwise, knead by hand. If the dough is sticky, knead in more confectioners' sugar until it is smooth. Store in an airtight container at room temperature or in the refrigerator.
2. To use, roll out on a clean surface that has been dusted with confectioners' sugar until it is 1/8 inch thick or thinner if you can. Drape over frosted and chilled cakes and smooth the sides down, or cut into strips to make bows and other decorations.

Friday, February 10, 2012

Football & Princess

Two things that usually don't go together unless your birthday falls on the Super Bowl! I got the chance to make cupcakes for a joint 3rd birthday/super bowl party! Pink Princesses and Football themes cupcakes.

Vanilla cupcakes made with a to die for strawberry buttercream (made with real strawberries!) and topped with pink marshmallow fondant tiara's.

Chocolate cupcakes with a creamy peanut butter frosting, topped with marshmallow fondant footballs and Super Bowl team logos.

Happy Birthday Princess Kennedy!