Friday, July 13, 2012

Freeze Ahead Breakfast

With the impending arrival of our little man fast approaching, I have been wanting to make a few different Make Ahead Meals to put in the freezer for after his arrival.

I must admit these last 8+ months I have gotten pretty lazy with cooking AND blogging about all my baking adventures...as my blog has reflected. I still have several baking posts to finish....eventually, maybe while I'm on maternity leave?! I'm assuming I will be even more lazy, or at least just won't have the time nor energy to make dinner once Baby Dexter is here, especially since I (fingers crossed) hope to exclusively breastfeed his first few months at least. 

Last weekend was a HUGE cooking weekend for me!! Aside from baking my last cake until the Fall, I did all my grocery shopping to prepare for my cooking event one day, poached my chickens and made homemade chicken broth another day, and prepared about 7 different meals on two other days.

Over the next week I will post several posts about the meals I made along with a few tips.      

Let's start with the most important meal of the day, breakfast!

I'm usually pretty boring when it comes to making myself breakfast, I usually stick to boring cereal, toast, or a bagel with cream cheese. Breakfast for dinner is a totally different story though and for an entirely different post, it's our favorite! When thinking about having a newborn around soon and not having a lot of time for breakfast in the mornings, I wanted to make sure I have the option of having something I can grab pretty quickly and make with little effort. I love me a McDonald's Egg McMuffin but am pretty sure I want to be leaving the house every morning with a little in tow to get one, plus all that added sodium and fat...we don't need. I decided to make my own breakfast burritos and sandwiches! These are quick, easy, filling, fairly inexpensive (compared to going to McD's every day), and I can control how much sodium is added to them.  
Ingredients:
·         1 lb. Pork Sausage
·         1 Pkg. Hash browns
·         8 to 12 Large eggs
·         1/4 cup milk
·         1 pkg. shredded cheese
·         salt and pepper to taste
·         1 to 2 pkg. flour tortillas

1. Brown sausage - drain on a paper towel.


2. Cook hash browns in the same pan.
3. While the hash browns are cooking - In a large mixing bowl, whisk eggs, milk, salt and pepper.

4. Add browned sausage back to the pan with the cooked hash browns.

5. Add the eggs to the sausage mixture and cook until the eggs are done, stirring gently.

6. After eggs are done - lay a tortilla on counter. Place egg mixture on tortilla. Top with cheese. Roll into a burrito.

7. Depending on how many eggs you use and how large you make each burrito, will determine how many burritos you will end up with. I used ten eggs which made me twenty-five burritos.

8. Wrap each burritos in Saran wrap.  Then place the wrapped burritos in freezer zip-lock bags.
From Freezer: Take the number of burritos you want out of the freezer, unwrap Saran wrap and place burritos in a paper towel. Warm for 45 seconds, rotate, warm for an additional 30 seconds. Serve with salsa, sour cream, or plain.

Breakfast Sandwiches

Ingredients 
  • 12  English muffins 
  • 12 eggs
  • 1/4 cup milk
  • salt and pepper to taste
  • 12 slices of cheese
  • 1/2 pound of bacon

1. Start by cooking the bacon. I used turkey bacon because I love it more than regular bacon but either will work. I cooked my bacon in the oven on 350 degrees for 15 minutes until lightly browned, this is the best way to cook regular bacon so it won't curl up like it will in the microwave or in a skillet.


2. While the bacon cook, whisk together eggs, milk, salt and pepper in a bowl until combined. Cook in large skillet over medium heat until scrabled.   
3. Once everything had finished cooking and slightly cooled, assemble the sandwiches. Break English muffins apart and put a spoonful of eggs, one slice of bacon (I split mine in halves to fit), and one slice of cheese on each muffin.


4. Wrap each sandwich in Saran wrap and place them in a gallon Ziploc bag. Then they are ready for the freezer.

From Freezer: Unwrap sandwich from saran wrap, place in paper towel and heat in microwave on HIGH for 2 minutes.  
 
Sausage Breakfast Burritos

Friday, June 8, 2012

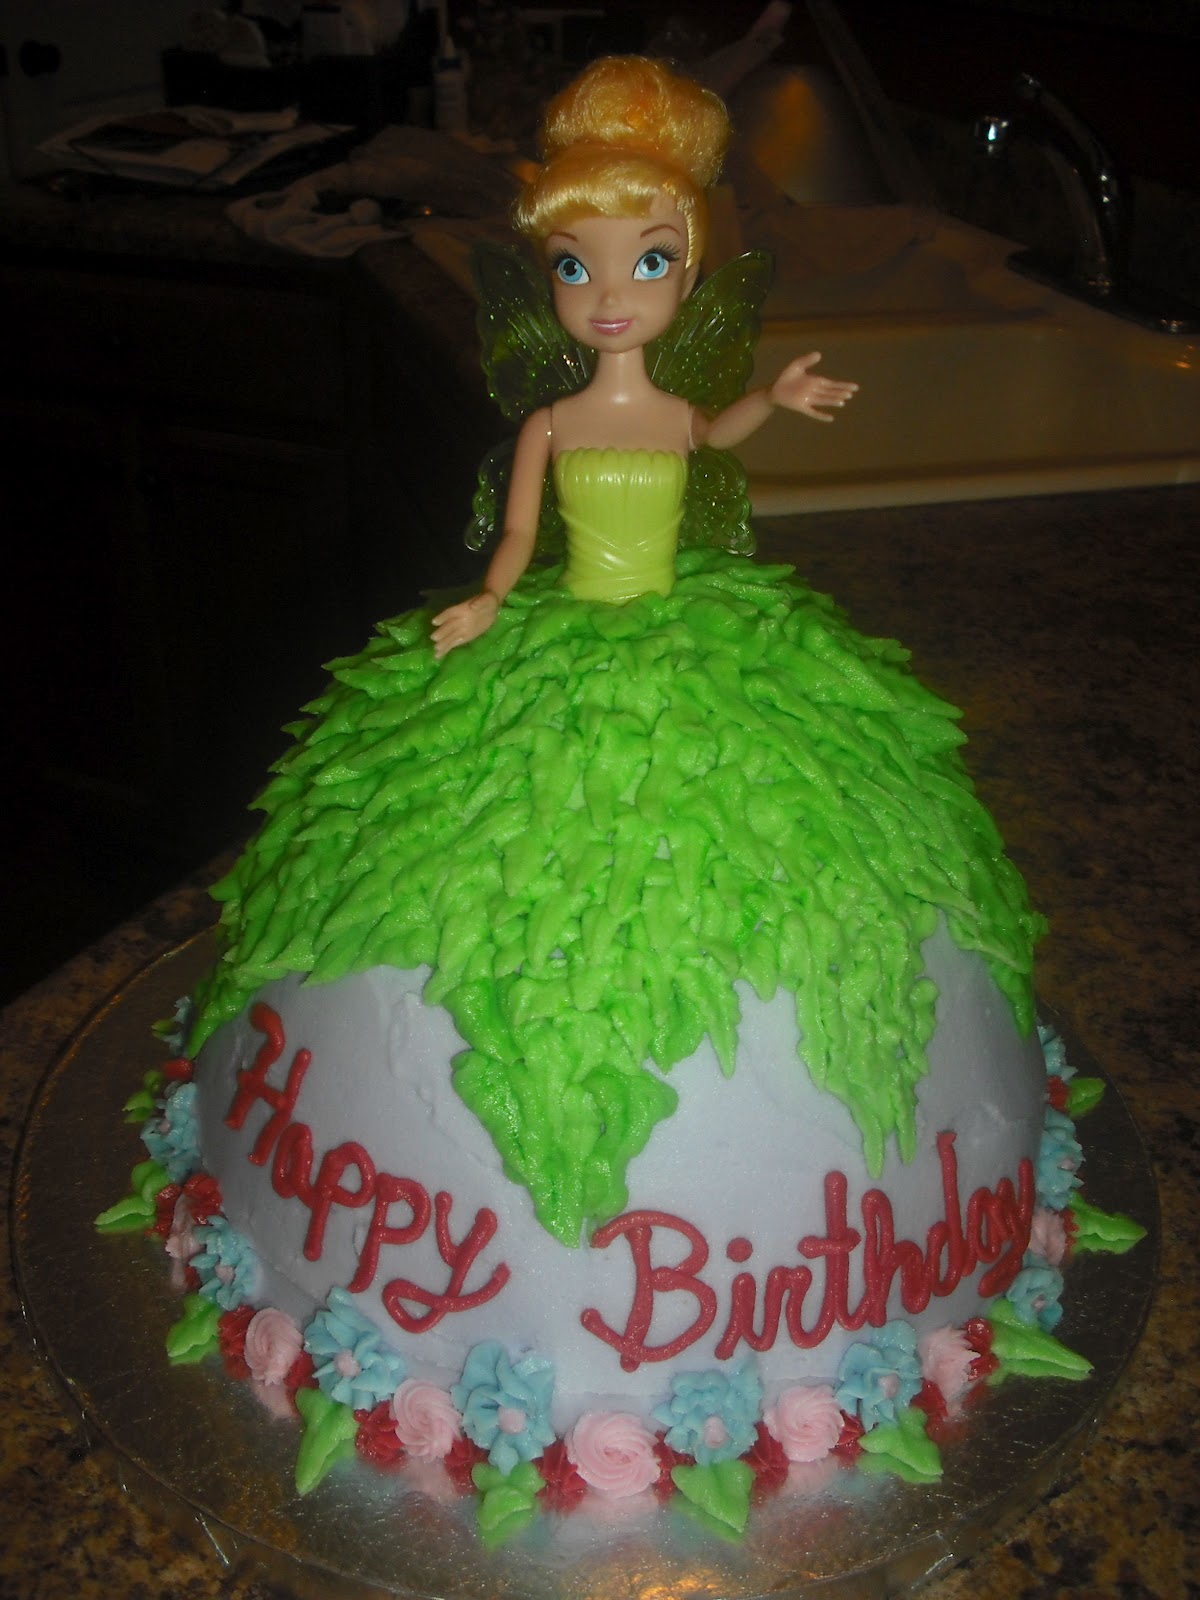
Tinkerbell Cake

Tinkerbell Birthday Cake

Dave was a HUGE fan of this cake! I think he was the most excited about it once he saw how it turned out, which really shouldn't surprise me with his love for all things Disney! :)


I used the Barbie cake pan from Wilton and used an actual Tinkerbell Barbie doll (found at Target) instread of the half dolls included with the pan or that you can buy at the craft store for these kinds of cakes. That way the birthday girl was able to keep her full length Tink as a birthday gift from the cake lady!  

Butterfly Cake

Butterfly Birthday Cake

My first butterfly cake and I think only my second time trying my hands at carving!


For this cake I printed off a coloring page from on-line and re-traced it on wax paper to fit the size of the cake I had. I cute out the butterfly and laid it on top of the cake so I would carve around the outside for the shape. After I peeled off the wax paper, I just used a knife to outline the design of the butterflies wings on the cakes and used different colored buttercream frosting to fill in.

I wish I would have outlines the entire butterfly's wings in the black to define them better in the picture.

The birthday girl requested pastel pink, purple and yellow for her butterfly.

Saturday, June 2, 2012

Buzz Lightyear

Buzz Lightyear Cake for a 2nd birthday.

I got to make Peyton's first birthday cake last year, seen here, so I feel privilaged to get to make his second cake this year!


This is a 2-layer vanilla cake with a chocolate mousse filling and a chocolate buttercream frosting, covered in marshmallow fondant.


I made the wings out of cardboard then covered then in fondant, so they aren't fully eidable!

Tuesday, May 29, 2012

Princess Aurora

I love trying new things and being tested with my baking skills, especially since I'm still very new at this and have so much to still learn when it comes to cake decorating.

Last week I got a call for a Princess birthday cake in which my customer wanted to order as a sheet cake. The birthday girl really wanted Princess Aurora from Sleeping Beauty but they were having trouble finding anyone who could do a Disney princess so they would settle for any princess. I of course did not want to disappoint a little birthday girl so I looked for ideas on-line and found a new technique to try out called Frozen Buttercream Transfer.

I found this great YouTube video found here that gave a really good tutorial. Basically all you need is a printed out image such as a coloring page at the size you need, wax paper, a cookie sheet, tape, and prepared buttercream in all the colors you need. First outline the image then start filling in practically like a paint by number. I froze mine for 24 hours before transferring onto my prepared sheet cake, peel off the wax paper and the pipe a boarder about the image since it's a bit thick.

And this is what I got!

Birthday girl Brynn was so surprised she actually got Princess Aurora on her cake!!

Saturday, May 12, 2012

Hawkeye Graduates

Another school year has come to an end....congrats to all the new graduates of 2012!!

This weekend the University of Iowa is holding their commencements and we know two wonderful students who will be receiving their diplomas.

  These two special students requested chocolate cupcakes with peanut butter frosting and red velvet cupcakes with cream cheese frosting.


I adorned these yummy graduations cupcakes with tiny little graduation caps, cute little diplomas, the U of I Tigerhawk, and a “2012” pennant. I think they turned out adorable!!


Congrats Matt and Casey on your huge accomplishment!

Friday, May 11, 2012

DIY Cupcake Stand

Cupcake Stand Instructions (holds 48-120 cupcakes)


Supplies:  
3 foam core boards, ¼” thick Dimensions: 20” x 30” (available at Staples or Michael's)
Exacto knife
Ruler
Hot glue gun
Modge Podge adhesive
Paper (wrapping paper or ten pieces of 12 x 12 scrapbook paper)
Ribbon (5 yards)

Directions:
1. Make your cuts…
    a.) Foam board piece 1
         cut a square 20” x 20” = Tier 1
         cut a square 8” x 8” = Tier 4
    b.) Foam board piece 2
         cut a square 16” x 16” = Tier 2
         cut a square 12” x 12” = Tier 3


2. Cut your tier supports…using Foam board piece 3
    a.) for tier 1…cut 4 strips 2” high x 10” long
    b.) for tier 2…cut 4 strips 4” high x 8” long
    c.) for tier 3…cut 4 strips 4” high x 6” long
    d.) for tier 4…cut 4 strips 4” high x 4” long


3. If you plan on covering your stand with scrapbook paper now is the time. Cover all of your Tiers with paper using Modge Podge adhesive. If you are using 12 x 12 scrapbook paper, tiers 1 & 2 can be tricky. Cut 2 pieces of 12” x 12” scrapbook paper in half diagonal (see source link). Then use the  4 pieces and glue it on the board. Trim edges with an exacto knife.
4. While your tiers dry make your tier supports. Starting with the “foot” of the stand, glue the corners of the

2” x 10” together. Continue by gluing the rest of the tier supports together so they are all square.
5. Cover the tier supports with paper.


6. If you want you can hot glue ribbon to the edges of each tier. It’s easier to do this prior to gluing the tiers to the tier supports.


 7. The hardest part here is making sure the tiers & supports are centered.
    Hot glue the 2” x 10” tier support to the bottom side of the 20” x 20” tier.
    Hot glue the 4” x 8” tier support to the bottom side of the 16” x 16” tier.
    Hot glue the 4” x 6” tier support to the bottom side of the 12” x 12” tier.
    Hot glue the 4” x 4” tier support to the bottom side of the 8” x 8” tier.

8. Glue the 8” x 8” to the top of the 12” x 12”.  Glue the the 16” x 16” to the top of the 20” x 20”.
    Glue the two pieces together & you have your cupcake stand.


I wanted to keep my cupcake stand white so I would be able to easily reuse my stand for any occasion. In order for me to be able to change the ribbon colors out for each use I did not hot glue my ribbon, instead I used corsage pins round each layer to hold the ribbon in place. It also added a nice detail with the pearl pin top. Since I didn’t use scrapbook paper to cover any of the tiers, I wrapped additional ribbon on coordinating colors around each tier support to add a pop a color behind the cupcakes.  

This cupcake/cake stand was made for my first wedding! It is definitely light weight and easy to move/transport yet still sturdy enough to hold 100 cupcakes or a small cake topper.